Did you have a Birth High? I did. It was the most amazing feeling. I remember thinking, "If I could do that, I can do anything!" Scientists tell me that's oxytocin rushing through my veins. If that's what it was, hook me up for some more! (Though, only the natural stuff please, Pitocin certainly didn't make me feel this way.)
I've been watching a lot of documentaries on Netflix recently, the latest of which have been The Business of Being Born and Pregnant in America. Both movies deal with the medical communities growing disregard for the exerience of birth and their emphasis on convenience. I highly recommend that everyone watch these, but I feel they'll have special meaning to expectant and current mothers. I know that they only solidified my resolve to have only natural births, but they've gotten me to thinking about births in general and how much do we really know?
In asking several of my friends, acquaintences, and family, I was horrified to learn that many of these people considered a Natural Birth to be a vaginal birth, with or without the use of drugs. They thought there's only two kinds: Natural or Cesarean. It made me sad to think that they didn't join in my joy of having a Natural (Unmedicated) Birth! No wonder they all just sort of said, "Yeah, and?"
Now, I'll be honest with you guys. I was pretty naive going into my pregnancy with Benjamin. I never considered a midwife, and I actually didn't think midwives practiced anymore in this day and age. I knew that I didn't want an epidural, but it was mostly because my mother had birthed all 4 of her children without one (so I could too) and not because of the potential risks. I didn't research doctors, I just went to the OB that I had my annual gynological appointments with. I didn't research hospitals (or birth centers for that matter), I just chose the one that was closest to my home. I did absolutely no research on possible complications or drugs used in "aiding" labor. My eyes glazed over in the birth class when they went over these things because "I had an uncomplicated pregnancy, why would I have a complicated labor?"
My OB didn't educate me on anything unless I asked about a particular subject. But how was I supposed to know what to ask if I didn't know my options?! I just went with the flow. I learned the hospital I chose had Doulas available for birthing mothers and after meeting the group of them, I knew that I wanted one of them to be with me, though if the hospital had not made it such an affordable option, I probably would have gone without.
Benjamin's labor was full of interventions, even though it started spontaneously. Around noon of the day he was born (10 hours of active labor at that point), my OB came in and wanted to start Pitocin. When I asked why, he said, "You're not progressing fast enough." I should have asked why I had a deadline (my waters had not broken yet), but I have a better understanding now that he wanted it all done before he was off shift for the day. When I refused, he told me that he'd give me 2 hours but then he had to start it. Again, why did he have to? Baby was in no danger. But, I had only progressed one centimeter and wasn't to the pushing stage that apparently my OB was after, so he started the Pitocin. Not long after that, I thought I was going to die, so I got the epidural. Then they had to up the pitocin because my labor slowed down. And then my doctor was done for the day and came to say he'd see me tomorrow, "hopefully with a baby." By the time I was ready to push, I had no idea what I was doing. I couldn't feel a damned thing wtih that epidural. But both my and baby's heartrate were dropping so I was told I had to get that baby out fast. I ended up with a 4th degree tear that took 9 weeks to heal because I pushed him out so fast he didn't have time to turn his body.
Because of my experience in Benjamin's labor, I was so much more prepared for Miriam's birth. I "reserved" the same doula that was there for Benjamin's birth. She was awesome. I wrote a detailed (super detailed) birth plan and hand delivered it to the birth center (they lost the one from Benjamin's birth when I had mailed it in). I was prepared to say No Way to any and all drugs pushed at me. Whenever threatened "Baby's in danger" at me, I was going to ask what exactly would happen if I waited 30 minutes to make a decision. I was not going to let someone strong-arm me into what they wanted to do. I was more comfortable for her birth. I moaned, as loudly as I wanted, without caring who heard me. I only had Chris and the doula in my room, and I declined all vaginal checks from the nurses. I never felt like I was going to die of pain in her labor. I won't lie, I got really really uncomfortable, but the pain felt like it was doing something progressive and positive. Sooner than I was ready for, Miriam was crowning. I do remember yelling at one of the nurses when she told me to push. I wanted to do this on my own. I wanted Miriam to come on her own, slowly, and safely. I delivered Miriam without a doctor present. A wonderful, and surprised, nurse caught her. Then, in rushed the doctor, arms flailing about that no one called to tell him I was close, and "what if she needed Pitocin" and "what if there was something wrong with the baby". I shrug at it. I was in a hospital afterall. There were 16 doctors present on the grounds, plus another 32 doctors on call if something did go wrong. I would have said no to the pitocin anyway, so I didn't care.
Miriam's birth empowered me. I wish that all women could have such empowering births. I wish that the birthing system in the United States educated women more on their choices of birth than on their choices of birth control. I didn't care for my experiences with doctors, though I loved the caring hands of my doula and the quiet support of my husband. From here on out, any babies being born in my family won't be happening with a doctor. All I felt was love for me, for my husband, for my children through the entire labor, and I don't want it taken away by the presence of anyone else.
I'm still on my Birth High and it empowers me to be a great mother. What did your birth do for you?
Showing posts with label pregnancy. Show all posts
Showing posts with label pregnancy. Show all posts
Wednesday, February 23, 2011
Saturday, October 2, 2010
She's here!!
Miriam Elizabeth made her grand entrance into this world on Thursday, September 30, 2010, at 5:04am! She weighed 8lbs, 5oz, and is 20.5" long. She looks exactly like her older brother, Benjamin, but definitely more "girly" in her features.

I had been sitting at 5cm dilated for two weeks, and being at risk for a placental abruption, my OB decided to do a membrane sweep at my 9:00am appointment to see if we couldn’t get labor jump-started. About an hour after the appointment, I started a dull back pain. At 6:00pm, I started to have contractions. They didn’t hurt, but they were felt first in my underbelly and then spread to my entire lower back. They were very regular, starting at 8 minutes apart, but never got stronger and never got closer together. By 8:30pm, they were pretty much gone, or maybe I had just become accustomed to them and didn’t notice anymore! I had been sitting on an exercise ball, and it had done a great job at relieving the back pressure because I could roll back, stretch my hips, and sink into the ball. So, at 9:30pm, I decided to just go to bed.
I woke at 10:55pm, feeling a strong contraction in my lower back. After two of those, I woke my husband, Chris, and told him that I needed his help to get through the contractions. He applied counter-pressure (pressing both in and down on my hips to give a “spreading” feeling), and the warmth of his hands made the contractions seem like nothing at all. These were very irregular contractions, first at 6 minutes apart, then 5 minutes, then 10 minutes, then 15 minutes, then back to 5 minutes. I laid in bed for another hour, then decided that they weren’t going away and we should call my father to come stay the rest of the night with Benjamin. I told him that the contractions weren’t regular, but it was going to happen tonight, and asked if he wanted to come now or should we call him when we were certain we were going to the hospital? He opted to come right away as it takes him 45 minutes to get to our house. I decided to take a shower to bide the time, but by the time I was done, my contractions were so strong that I was having difficulty breathing through them on my own. So as soon as my father arrived to babysit Benjamin, we left for the hospital, even though my contractions were still irregular.
When I arrived at 1:30am, I was 7cm dilated. I chose to sit on the birthing ball since that’s what worked for me at home. My doula, Vanessa, showed up shortly afterwards and sat in front of me to help control my breathing, while Chris continued to sit behind me and applied counter-pressure to my back. My contractions remained irregular, both in timing and in strength. It felt like I would have one really strong contraction, then a small one, and then a large one again. I had a few contractions that were so hard and so long that I vomited immediately afterwards. Everyone assured me that vomiting is good because it acts as 10 contractions since I’m pushing downward with each vomit. Though, I wished I hadn’t chosen to eat Sloppy Joes for dinner! At about 4:00am, I moved into transition and I changed my breathing to a moaning. I felt like I had a better control over the release of the pressure by using words like “okay, okay, okay,” and that actually made me smile and calmer because that’s what Benjamin says when you ask him to do something, “okay, okay, okay.” I moved to the bed on my knees and hung my upper body over a support bar when the contractions became really intense. The support bar was a little high for me, so I turned around on my hands and knees and buried my face into a pillow. I did a lot of physical shaking with the transitional contractions.
At 4:55am, my contractions made a sudden change to strong, regular, smooth contractions. With two of these, my water broke, and the very next contraction had me pushing the baby’s head out! The nurses tried to encourage me to lay on my back, but I didn’t want to move from my hands and knees, so that’s where I stayed for the pushing. At first, the nurses were telling me to push, but I told them, “Stop telling me to push! Don’t tell me to push! I can do this on my own!” I’m afraid I embarrassed Chris because of how vocal and loud I was being. I don’t feel that I actively pushed, but that I let the contractions do the work. To be absolutely honest, as the head was crowning, I got very scared and I wanted to stop, but I couldn’t. It was okay though, because 6 minutes later, Miriam was fully delivered!!
The on-call doctor showed up 15 minutes later, and the only thing she did was deliver the placenta which was being very stubborn. She administered pitocin for that, and I’ve had it one additional time because I’m having a hard time with getting the post-partum clotting to stick.
I’m feeling pretty good!! I had a tiny little tearing, not even enough to consider a 1st degree, which is wonderful compared to the 4th degree one I had with Benjamin. It’s amazing how wonderful and proud I feel after a non-medicated birth!
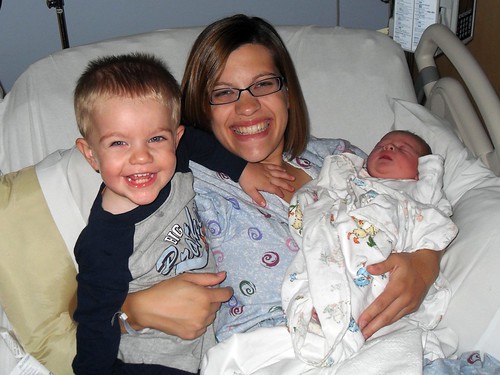
Benjamin is enjoying being a big brother, if only because it means that the grandparents and Daddy are at home everyday. He hasn't quite figured out exactly how this new baby relates to him. As a toddler, it's still all about Benjamin!
I had been sitting at 5cm dilated for two weeks, and being at risk for a placental abruption, my OB decided to do a membrane sweep at my 9:00am appointment to see if we couldn’t get labor jump-started. About an hour after the appointment, I started a dull back pain. At 6:00pm, I started to have contractions. They didn’t hurt, but they were felt first in my underbelly and then spread to my entire lower back. They were very regular, starting at 8 minutes apart, but never got stronger and never got closer together. By 8:30pm, they were pretty much gone, or maybe I had just become accustomed to them and didn’t notice anymore! I had been sitting on an exercise ball, and it had done a great job at relieving the back pressure because I could roll back, stretch my hips, and sink into the ball. So, at 9:30pm, I decided to just go to bed.
I woke at 10:55pm, feeling a strong contraction in my lower back. After two of those, I woke my husband, Chris, and told him that I needed his help to get through the contractions. He applied counter-pressure (pressing both in and down on my hips to give a “spreading” feeling), and the warmth of his hands made the contractions seem like nothing at all. These were very irregular contractions, first at 6 minutes apart, then 5 minutes, then 10 minutes, then 15 minutes, then back to 5 minutes. I laid in bed for another hour, then decided that they weren’t going away and we should call my father to come stay the rest of the night with Benjamin. I told him that the contractions weren’t regular, but it was going to happen tonight, and asked if he wanted to come now or should we call him when we were certain we were going to the hospital? He opted to come right away as it takes him 45 minutes to get to our house. I decided to take a shower to bide the time, but by the time I was done, my contractions were so strong that I was having difficulty breathing through them on my own. So as soon as my father arrived to babysit Benjamin, we left for the hospital, even though my contractions were still irregular.
When I arrived at 1:30am, I was 7cm dilated. I chose to sit on the birthing ball since that’s what worked for me at home. My doula, Vanessa, showed up shortly afterwards and sat in front of me to help control my breathing, while Chris continued to sit behind me and applied counter-pressure to my back. My contractions remained irregular, both in timing and in strength. It felt like I would have one really strong contraction, then a small one, and then a large one again. I had a few contractions that were so hard and so long that I vomited immediately afterwards. Everyone assured me that vomiting is good because it acts as 10 contractions since I’m pushing downward with each vomit. Though, I wished I hadn’t chosen to eat Sloppy Joes for dinner! At about 4:00am, I moved into transition and I changed my breathing to a moaning. I felt like I had a better control over the release of the pressure by using words like “okay, okay, okay,” and that actually made me smile and calmer because that’s what Benjamin says when you ask him to do something, “okay, okay, okay.” I moved to the bed on my knees and hung my upper body over a support bar when the contractions became really intense. The support bar was a little high for me, so I turned around on my hands and knees and buried my face into a pillow. I did a lot of physical shaking with the transitional contractions.
At 4:55am, my contractions made a sudden change to strong, regular, smooth contractions. With two of these, my water broke, and the very next contraction had me pushing the baby’s head out! The nurses tried to encourage me to lay on my back, but I didn’t want to move from my hands and knees, so that’s where I stayed for the pushing. At first, the nurses were telling me to push, but I told them, “Stop telling me to push! Don’t tell me to push! I can do this on my own!” I’m afraid I embarrassed Chris because of how vocal and loud I was being. I don’t feel that I actively pushed, but that I let the contractions do the work. To be absolutely honest, as the head was crowning, I got very scared and I wanted to stop, but I couldn’t. It was okay though, because 6 minutes later, Miriam was fully delivered!!
The on-call doctor showed up 15 minutes later, and the only thing she did was deliver the placenta which was being very stubborn. She administered pitocin for that, and I’ve had it one additional time because I’m having a hard time with getting the post-partum clotting to stick.
I’m feeling pretty good!! I had a tiny little tearing, not even enough to consider a 1st degree, which is wonderful compared to the 4th degree one I had with Benjamin. It’s amazing how wonderful and proud I feel after a non-medicated birth!
Benjamin is enjoying being a big brother, if only because it means that the grandparents and Daddy are at home everyday. He hasn't quite figured out exactly how this new baby relates to him. As a toddler, it's still all about Benjamin!
Sunday, July 4, 2010
Sometimes, you just have to give in...
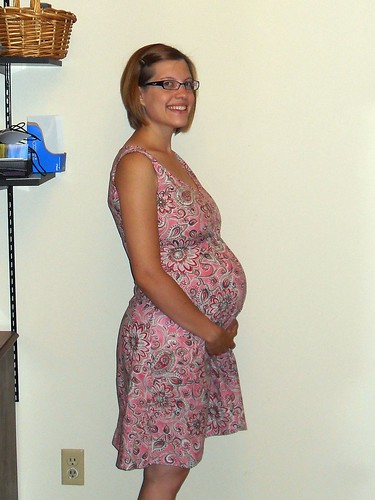
I finished a summer (maternity) dress for myself this morning. I haven't sewn any clothing for myself while using a pattern since I hit puberty, so I'm still learning how to fit for me. I should have added at least 2" to the bust area because my boobs pull the back so far forward that the armholes cut a bit into the back of my arms, and the boobs are a bit squished in there. Pattern is McCalls m6074.

(Yes, this is me at 28 weeks pregnant! I'm in the home stretch!)
Then, because I had about 2 feet of fabric left, I decided to make my gestating daughter a matching dress. I made a pillowcase style dress, but without the drawstring. I didn't want her to get a shoulder strap caught on something and end up choking herself! So I put some 1/2" elastic in the casing instead. I've got to run to the store and pick up some bias tape binding, which I'm going to put around the armholes and use that for the shoulder ties. I hope to find some matching fabric to make bloomers out of too! This dress is suggested to fit 6 months to 18 months (though likely as a shirt by 18 months).
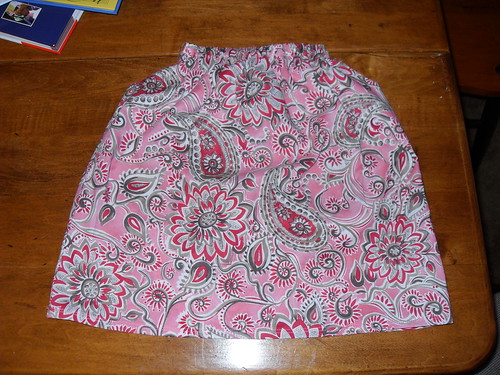
(Tutorial to follow when the dress is all finished!)
(Yes, this is me at 28 weeks pregnant! I'm in the home stretch!)
Then, because I had about 2 feet of fabric left, I decided to make my gestating daughter a matching dress. I made a pillowcase style dress, but without the drawstring. I didn't want her to get a shoulder strap caught on something and end up choking herself! So I put some 1/2" elastic in the casing instead. I've got to run to the store and pick up some bias tape binding, which I'm going to put around the armholes and use that for the shoulder ties. I hope to find some matching fabric to make bloomers out of too! This dress is suggested to fit 6 months to 18 months (though likely as a shirt by 18 months).
(Tutorial to follow when the dress is all finished!)
Monday, May 17, 2010
How to Make a Shirred Sundress: The Instructions
Okay, you've done your measuring. You've done your fabric shopping. You've even prepared your fabric. So...what are you waiting for?!?!
Lay your fabric out on the table or other hard surface, and drag out your measuring tape. (You'll notice that I am using a cutting mat for guiding my cuts. If you are using a patterned fabric, you probably won't need to use one for your cuts as you can use your pattern to guide you.)

Step 1: Start by cutting off the top salvage end. The salvage is the place where the fabric threads were strapped onto the loom. Unless it's a very pretty salvage (most aren't), you'll want to cut them off.
Step 2: Measure from the top of your fabric to the length you want your dress to be. For me this is 44" + 1" for seam allowances. Make your second cut along the bottom of the fabric.
Step 3: Lining up your first two cuts, square off one end of the fabric to make it start looking like a rectangle.
Step 4: Measure from your last cut across the fabric to the width you need for your dress. (Bust measurement x 2. This is 56" for me.) Make your final cut at this measurement to turn your fabric into a rectangle with right angles.
All your cutting is done! Set aside any fabric scraps you have for making the straps. Now break out that iron, and let's create the skeleton of our dress!
Do these Steps 1-5 for both the top and bottom edges of your fabric.
Step 1: Lay the fabric wrong side up. Using your Seam Guide, fold up the edge of the fabric 1/2" and pin into place. Do this the entire length of the fabric.
Step 2: Using the appropriate setting on your iron, press your fabric to make a nice crease along the fold line.
Step 3: Removing pins along the way, fold up the pressed edge of the fabric another 1/2" and pin back into place. This will hide the "raw" edges of your fabric so that it doesn't fray.
Step 4: Go back to your iron and press this new fold into a nice crease.
Step 5: Start up your sewing machine. Using fabric matching thread in both the top spool and the bobbin, sew a straight stitch 1/4" along the edge of your fabric (this stitch should fall right in the middle of your creased hem fold.). Make sure you backstitch at the beginning and ending of your seam so that the thread doesn't pull out.
Step 6: With right sides together, fold your fabric in half, matching the two remaining raw edges, and pin together.
Step 7: Seam 1/2" from the raw edges.

Step 8: Head back to your iron and press the seam open.
Now you have 2 hemmed edges; this is the top and the bottom of the dress. And your dress will also now be a tube. Step back and admire the beautiful seams that you have created. Make your husband admire. Dance around the living room with your toddler. Be so rediculously proud of your half-done creation that your family thinks you've jumped off the deep end. :-)
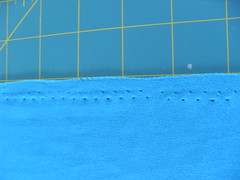
Now, let's work on shirring. Shirring is the technique of using elastic thread to create a stretchy gathered fabric. Each machine is a little fussy with elastic thread, so if these instructions don't work for you, do a little Google search on "name of sewing machine - elastic thread." Chances are someone has tried it with your machine. If you can't find any instructions, leave a comment with the type of machine you have and I'll see if I can guide you. I've used both an old machine with a bobbin case and this new computerized, drop-in bobbin machine that has a specific elastic stitch. Practice these next steps on some scrap fabrics until it looks the way you want it to!

Step 1: Wind the elastic thread into your bobbin. You will want to do this by hand. Make sure that the thread isn't pulled tight that it's stretched out, but isn't so loose so that it's falling off the bobbin. Plop the bobbin into place, and, if you have a drop-in bobbin like me, make sure the elastic thread is running through the bobbin tension disks. Continue to use the fabric matching thread on your top spool.
Step 2: Lengthen your straight stitch to 3.5-4mm. Also, if you don't have automatic tension, set it to 4. (REMEMBER: Practice, practice, practice!! You certainly want to make sure this looks right before you go ahead and sew on your dress. Remember you will loose approximately 1/2 your fabric width because of the elastic. Also, your elastic thread should be smoothly sewn along the back. Adjust the bobbin tension if you don't think it looks right.)
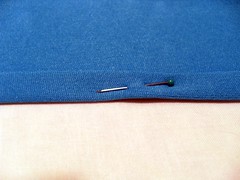
Step 3: Putting your needle down in the middle of your side seam, sew your first shirred line 1/4" from the top of your fabric edge. (This is right on top of your hem seam. Because of this, you may choose to seam your hem with the elastic thread right from the beginning.) You may, or may not, choose to backstitch your elastic stitch. If not, leave at least 1" of elastic thread, and knot the ends together so that it does not slip through your stitching and become loose. I chose to backstitch 3 stitches.
Step 4: Stretching the fabric out so it lays flat (which is really stretching the elastic thread, not pulling the fabric out of shape), sew your next line of elastic stitching 1/4" from the first line of stitching.
Step 5: Continue sewing lines of elastic stitching, each 1/4" apart, until you have enough to cover your bust length (Measurement B). I have stitched until I reached 9" from the top hem.
Yay!! You have shirred!! You will notice that with each additional line of elastic stitching, your fabric gathers more and more. It should remain stretchy, enough so to go around your bust. Now, for the last and final step...
Step 1: With your dress on, measure from the top in the front to the top in the back. This tells you how long your straps need to be.
Step 2: Cut your fabric to double your strap width plus 1". For me, I wanted 2" straps, so I would cut it 3" wide. And cut it to the length you want, plus 2". I wanted 10" long, so I cut a 12" long strip. Cut 2 strips, one for each strap.
Step 3: With right sides facing, pin the raw edges together along the long edge and one short edge.
Step 4: Seam 1/2" from the edge, along the long side and one short side, leaving the other short side open.
Step 5: Turn the strap right side out. Head back to your iron and press the seams flat.
Step 6: Turn in the raw edge of the unfinished short end and press 1/2" of the raw edge to the inside of the strap.
Step 7: Slip stitch the open end closed.
Step 8: Attach the strap to the top of the dress in both the front and the back. Sew a 1/4" seam, placing stitches in the hem of the dress. (That's 1/4" from the edge of the strap and 1/4" from the edge of the dress top.)
TaDa!! Try your dress on!


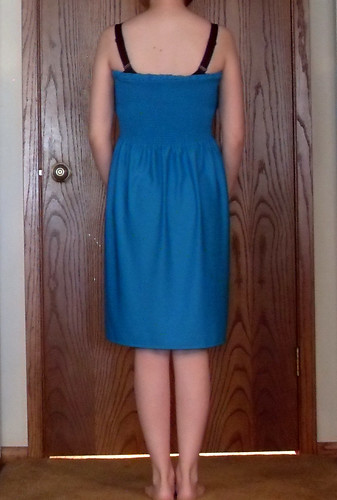
Now you are absolutely all done. I'm not sure I'm actually put on the staps. I don't know if the style really fits large chested women like me. It does fit nicely as a maternity skirt (you can do the same technique, but with less rows of shirring, just enough to create a waist). Tell me what you think!
Here are few sites that I found that helped me figure out the shirring and elastic thread thing. Review them if you're having trouble!
Pretty Ditty Shirring Tutorial
ThreadBanger Shirred Summer Dress
Lay your fabric out on the table or other hard surface, and drag out your measuring tape. (You'll notice that I am using a cutting mat for guiding my cuts. If you are using a patterned fabric, you probably won't need to use one for your cuts as you can use your pattern to guide you.)
Step 1: Start by cutting off the top salvage end. The salvage is the place where the fabric threads were strapped onto the loom. Unless it's a very pretty salvage (most aren't), you'll want to cut them off.
Step 2: Measure from the top of your fabric to the length you want your dress to be. For me this is 44" + 1" for seam allowances. Make your second cut along the bottom of the fabric.
Step 3: Lining up your first two cuts, square off one end of the fabric to make it start looking like a rectangle.
Step 4: Measure from your last cut across the fabric to the width you need for your dress. (Bust measurement x 2. This is 56" for me.) Make your final cut at this measurement to turn your fabric into a rectangle with right angles.
All your cutting is done! Set aside any fabric scraps you have for making the straps. Now break out that iron, and let's create the skeleton of our dress!
Do these Steps 1-5 for both the top and bottom edges of your fabric.
Step 1: Lay the fabric wrong side up. Using your Seam Guide, fold up the edge of the fabric 1/2" and pin into place. Do this the entire length of the fabric.
Step 2: Using the appropriate setting on your iron, press your fabric to make a nice crease along the fold line.
Step 3: Removing pins along the way, fold up the pressed edge of the fabric another 1/2" and pin back into place. This will hide the "raw" edges of your fabric so that it doesn't fray.
Step 4: Go back to your iron and press this new fold into a nice crease.
Step 5: Start up your sewing machine. Using fabric matching thread in both the top spool and the bobbin, sew a straight stitch 1/4" along the edge of your fabric (this stitch should fall right in the middle of your creased hem fold.). Make sure you backstitch at the beginning and ending of your seam so that the thread doesn't pull out.
Step 6: With right sides together, fold your fabric in half, matching the two remaining raw edges, and pin together.
Step 7: Seam 1/2" from the raw edges.
Step 8: Head back to your iron and press the seam open.
Now you have 2 hemmed edges; this is the top and the bottom of the dress. And your dress will also now be a tube. Step back and admire the beautiful seams that you have created. Make your husband admire. Dance around the living room with your toddler. Be so rediculously proud of your half-done creation that your family thinks you've jumped off the deep end. :-)
Now, let's work on shirring. Shirring is the technique of using elastic thread to create a stretchy gathered fabric. Each machine is a little fussy with elastic thread, so if these instructions don't work for you, do a little Google search on "name of sewing machine - elastic thread." Chances are someone has tried it with your machine. If you can't find any instructions, leave a comment with the type of machine you have and I'll see if I can guide you. I've used both an old machine with a bobbin case and this new computerized, drop-in bobbin machine that has a specific elastic stitch. Practice these next steps on some scrap fabrics until it looks the way you want it to!
Step 1: Wind the elastic thread into your bobbin. You will want to do this by hand. Make sure that the thread isn't pulled tight that it's stretched out, but isn't so loose so that it's falling off the bobbin. Plop the bobbin into place, and, if you have a drop-in bobbin like me, make sure the elastic thread is running through the bobbin tension disks. Continue to use the fabric matching thread on your top spool.
Step 2: Lengthen your straight stitch to 3.5-4mm. Also, if you don't have automatic tension, set it to 4. (REMEMBER: Practice, practice, practice!! You certainly want to make sure this looks right before you go ahead and sew on your dress. Remember you will loose approximately 1/2 your fabric width because of the elastic. Also, your elastic thread should be smoothly sewn along the back. Adjust the bobbin tension if you don't think it looks right.)
Step 3: Putting your needle down in the middle of your side seam, sew your first shirred line 1/4" from the top of your fabric edge. (This is right on top of your hem seam. Because of this, you may choose to seam your hem with the elastic thread right from the beginning.) You may, or may not, choose to backstitch your elastic stitch. If not, leave at least 1" of elastic thread, and knot the ends together so that it does not slip through your stitching and become loose. I chose to backstitch 3 stitches.
Step 4: Stretching the fabric out so it lays flat (which is really stretching the elastic thread, not pulling the fabric out of shape), sew your next line of elastic stitching 1/4" from the first line of stitching.
Step 5: Continue sewing lines of elastic stitching, each 1/4" apart, until you have enough to cover your bust length (Measurement B). I have stitched until I reached 9" from the top hem.
Yay!! You have shirred!! You will notice that with each additional line of elastic stitching, your fabric gathers more and more. It should remain stretchy, enough so to go around your bust. Now, for the last and final step...
Step 1: With your dress on, measure from the top in the front to the top in the back. This tells you how long your straps need to be.
Step 2: Cut your fabric to double your strap width plus 1". For me, I wanted 2" straps, so I would cut it 3" wide. And cut it to the length you want, plus 2". I wanted 10" long, so I cut a 12" long strip. Cut 2 strips, one for each strap.
Step 3: With right sides facing, pin the raw edges together along the long edge and one short edge.
Step 4: Seam 1/2" from the edge, along the long side and one short side, leaving the other short side open.
Step 5: Turn the strap right side out. Head back to your iron and press the seams flat.
Step 6: Turn in the raw edge of the unfinished short end and press 1/2" of the raw edge to the inside of the strap.
Step 7: Slip stitch the open end closed.
Step 8: Attach the strap to the top of the dress in both the front and the back. Sew a 1/4" seam, placing stitches in the hem of the dress. (That's 1/4" from the edge of the strap and 1/4" from the edge of the dress top.)
TaDa!! Try your dress on!
Now you are absolutely all done. I'm not sure I'm actually put on the staps. I don't know if the style really fits large chested women like me. It does fit nicely as a maternity skirt (you can do the same technique, but with less rows of shirring, just enough to create a waist). Tell me what you think!
Here are few sites that I found that helped me figure out the shirring and elastic thread thing. Review them if you're having trouble!
Pretty Ditty Shirring Tutorial
ThreadBanger Shirred Summer Dress
Wednesday, April 14, 2010
Guess what?!
I'm pregnant with Baby #2!! I'm sorry I have been absent from the new blog, but can I make excuses? We found out about the pregnancy in January. It was kind of unexpected as we were planning on getting pregnant again in October 2010, not having the baby in October! Alas, it happened, and we're happy and excited. I had a miserable 1st trimester with lots of morning sickness, and since I have chosen to do extended breastfeeding with Benjamin, I found myself extremely dehydrated between supporting the two of them (Benjamin and baby). Once I reached the dehydration stage, I just couldn't keep anything in my system and needed the help of a few bags of IV saline solution to better myself. I can't say if I'm as exhausted with this pregnancy as I was with Benjamin, mostly because I'm generally exhausted from chasing him and the 2 toddler boys that I nanny around! However, I didn't have any morning sickness with Benjamin, so could this mean "girl?" We'll have to wait at least another month to find that out, so stay tuned!
Well, now that I'm heading into my 16th week, I'm feeling much better and the nesting bug has hit me hard. I don't really feel the need to prepare specifically for the baby though. Perhaps this is because I have the basics of everything we'll need for a new little one. If this is a girl, we will have to purchase some "girl" clothes to fill out the wardrobe that's filled with clearly "boy" clothes. There are some additional things we're looking at, such as a duo/tandem stroller, an additional convertible carseat, a highchair (right now we use a convertible booster chair that Benjamin will get to continue using), and of course, a minivan.
So what does a girl like me do when the need to nest is so strong but there's no need to actually prepare for the baby? She crafts! I'm looking forward to attempting to sew a few of my own maternity sundresses like the one below. I haven't been able to find "modern" maternity sewing patterns, so I believe that this style will allow for some extra belly room. Stay tuned while I search for my inspiration!

photo courtesy of Knittingand
Subscribe to:
Posts (Atom)