Tuesday, April 20, 2010

Time Out

I'm sorry I haven't posted the next in the Sundress Tutorial. I had this wonderful LONG post on fabric, and it took me quite a long time to write it, as I have 3 toddler boys running around. However, the laptop battery died just before I came to "publish post," and there must have been a glitch with Blogger because it only saved half the post. So...you'll have to wait a bit for me to stop being mad at Blogger and rewrite it. :-D

Also, the sewing has halted. My machine is a VERY old machine, and it just doesn't work well anymore. So I'm getting a new machine!! I'm very excited!!! It's an early early Christmas present from my parents. It's a beautiful Brother 110-stitch Computerized Sewing Machine. And now I must await for it to be delivered. It really is like Christmas!!

Saturday, April 17, 2010

How to make a Shirred Sundress: Measuring

I stopped at a not-so-local JoAnn Fabrics today. I wasn't planning on it, but I walked past the window and saw a lot of 50% off signs over their fabric bolts. I figured it couldn't hurt to go look! My local JoAnn's doesn't have much in the way of clothing fabrics, just a lot of quilting cottons. This one was quite split down the middle: half quilting cottons, half clothing fabrics (knits, silks, shirtings, fleeces). I'm sure I bored my husband to death, but Benjamin was quite helpful rearranging all the thread spools in the display. :-) I was able to pick up 2 jersey knit fabrics for 1/2 off. After I grabbed the threads I needed, my total price for what I need to make 2 shirred dresses was less than $16! This is when my husband commented, "Why don't you shop here more often?" He may get his wish!!

Let's make some Shirred Sundresses!
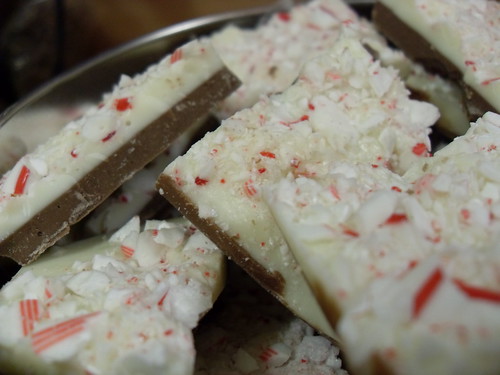

(photo courtesty of TangerineSamurai)

So, while I found many tutorials online on how to create shirring, most of the available free patterns are designed for little girls, and this creates a problem for most adult women since we have boobs and hips that aren't necessarily proportionate to each other. The few patterns that I came across for women didn't go into enough detail for my liking. I'm a intermediate sewer. I have a good knowledge of fabrics and which one to use to get drape or structure. I know how to press a hem and tack down seams. I can do buttonholes, but I have to look up a refresher first, and zippers are off limits for me. I truly believe that this pattern, however, will work for absolute beginners. Just as long as you know how to use an iron and stitch a straight stitch, you can do this. I'll walk you through everything else!

First, we'll get our measurements. This is a "no-pattern" pattern, so it is very important that you get accurate measures with this. Get someone to help you, or stand in front of a mirror.

Bust Measurements:
A: This is your smallest bust circumference. It is the measurement used to determine your bra band size. Measure under your bra line. (I measured at 28")
B: This is your bust length. Determine where you would like the top of the dress to lay. Then measure from that point, over the fullest part of your breast, to the bottom of your bra. This number is the amount of shirring you will need to give a great umpire waist look. (I measured at 9")

Length:
C: Determine if you would like a short mid-thigh dress, or a knee length dress, or even an ankle length dress. This is important to know before you head to the fabric store. Start from your under-the-bra measurement (My measurement B was 9", so I put the 9" mark at the bottom of my bra.), then let the tape measure hang. Make note of where you want the dress to end. (I measured 49" for ankle length and 34" for just-below-the-knee length.)

Straps:
D: How wide of straps would you like? Straps are totally optional, but I cannot live without a bra, and frankly, I don't like my not-so-pretty bra straps showing. I chose a 2" width for my straps because that will give me 0.5" coverage on each side of my bra strap. I think length of straps is better determined after you have the body of the dress made and on. This way you give yourself a little room for error.

(You know, while you're doing all this measuring, measure yourself to make sure you're wearing the correct size bra. If you're built anything like me, you're likely to have been wearing a majorly wrong bra size for a long time. You'll be surprised at how great a good-fitting bra feels! Stay away from those online calculators. They're 90% wrong. Measure yourself around your bust at the widest point. Keep the measuring tape level with the floor. Take your fullest bust measurement minus Measurement A. Each inch equals one cup size. Your Measurement A is your band size, the result of your math is your cup size. So for me: fullest bust = 35", Measurement A = 28". I wear a 28G. Since you don't typically find that size in your local store, I had been wearing a 36DD for way too long!)

Next: Head to the fabric store!

Wednesday, April 14, 2010

Guess what?!

I'm pregnant with Baby #2!! I'm sorry I have been absent from the new blog, but can I make excuses? We found out about the pregnancy in January. It was kind of unexpected as we were planning on getting pregnant again in October 2010, not having the baby in October! Alas, it happened, and we're happy and excited. I had a miserable 1st trimester with lots of morning sickness, and since I have chosen to do extended breastfeeding with Benjamin, I found myself extremely dehydrated between supporting the two of them (Benjamin and baby). Once I reached the dehydration stage, I just couldn't keep anything in my system and needed the help of a few bags of IV saline solution to better myself. I can't say if I'm as exhausted with this pregnancy as I was with Benjamin, mostly because I'm generally exhausted from chasing him and the 2 toddler boys that I nanny around! However, I didn't have any morning sickness with Benjamin, so could this mean "girl?" We'll have to wait at least another month to find that out, so stay tuned!

Well, now that I'm heading into my 16th week, I'm feeling much better and the nesting bug has hit me hard. I don't really feel the need to prepare specifically for the baby though. Perhaps this is because I have the basics of everything we'll need for a new little one. If this is a girl, we will have to purchase some "girl" clothes to fill out the wardrobe that's filled with clearly "boy" clothes. There are some additional things we're looking at, such as a duo/tandem stroller, an additional convertible carseat, a highchair (right now we use a convertible booster chair that Benjamin will get to continue using), and of course, a minivan.

So what does a girl like me do when the need to nest is so strong but there's no need to actually prepare for the baby? She crafts! I'm looking forward to attempting to sew a few of my own maternity sundresses like the one below. I haven't been able to find "modern" maternity sewing patterns, so I believe that this style will allow for some extra belly room. Stay tuned while I search for my inspiration!


photo courtesy of Knittingand

Saturday, January 30, 2010

When we bought our condo in July 2008, we had these grand plans of remodeling. Or perhaps I should say I had grand plans of remodeling! My husband will instigate nothing of the sort.

The condo unit was staged beautifully. The previous owners, both of whom had passed away prior to the sale, had bought into the association as the units were being built in 1981. They were able to be right in the midst of the contractors, working with the designers to make it their own space. Because of this, we have a few amenities that no other unit has, such as a window in our dining room and an outlet in the main closet (they had placed a deep freeze there). They also picked out the carpet, fixtures, appliances, and wallpaper as the unit was built.

Click to play this Smilebox slideshow: Our Condo - The Before
Create your own slideshow - Powered by Smilebox
Make a Smilebox slideshow


As you can see, there's a tremendous amount of wallpaper and wall to wall carpeting. We had an assessor come take a look and with no structural damage, I thought it would be easy peasy to redecorate!

Unfortunately, as we tackled the kitchen and the main bath, we realized that there was no priming done behind the wallpaper. It was laid directly on the drywall. It didn't take long before our energy to continue burnt out. It also didn't help that I was getting more and more pregnant with Benjamin and couldn't handle all the fumes of wallpaper remover and paint. We left the kitchen half done with the wallpaper removed, a shody wall painting job, and cabinet faces repainted, and the main bath has half the wallpaper down.

This was supposed to be the year for finishing the remodel. However, we have had water damage to our unit seep down from the attic. This has damaged our walls and ceilings. I'm not going to be able to move forward with any cosmetic work until the structural work has been taken care of. Unfortunately, the condo association doesn't think that this work is a priority because they've taken care of the attic damage and "it won't get any worse" in my unit. It may be a year or two before they deem it worth fixing.

I wish I could say my condo looks as nice and clean as the seller's staging, but alas, I have 3 cats, a baby, and a husband. It will never look that good!

Saturday, January 23, 2010

What to say?

A friend teased me when I started up this blog, saying, "Oh, another blog that you'll never have the time to update." Well, she got me! To be honest, I don't know what I wanted to write about. I have my son, who is now 11 months old, and I could go on and on bragging about him. I have my family. I did host Christmas Eve for my husband's family, as is our new tradition since buying our condo, and there are a lot of changes with my siblings. I have our condo. There's a lot of renovation in the works. I have my knitting. Now that Benjamin can entertain himself a little bit more, I've actually found some time!

So, tell me, what do you want to hear about??

Saturday, December 19, 2009

Peppermint Bark

We were walking through Costco the other day, when Chris stopped at a table laiden with holiday treats. My husband is the exact reason stores set up these tables. He picked up a half pound tub of peppermint bark priced around $8.00. He gave me the sad puppy eyes, and I said, "No way! I can make that for cheaper." Chris said, "But can you do it with both kinds of chocolate?" Oh, you bet I can!


This turned out way easier than I even thought, and in less than an hour, we had peppermint bark! I made two and a half pounds for less than $7.00. My husband is well pleased.

Ingredients:
roughly 1 pound milk chocolate
roughly 1 pound white chocolate
1/2 teaspoon peppermint extract
12 candy canes
butter

Directions:
Place the candy canes into a Ziploc bag and use a rolling pin or metal frying pan to crush into tiny little bits. Set aside in a bowl for later.
Line a jelly roll pan with a sheet of wax paper, and use the butter to grease the paper. This will help free the chocolate later.
In a double boiler (or a heat safe mixing bowl situated over a pot), melt the milk chocolate. Pour onto wax paper and spread evenly. Shaking the pan a little will help spread everything out. Place in refrigerator for 20 minutes.
Pull the milk chocolate out of fridge. Using the double boiler, melt the white chocolate and mix in the peppermint extract. Pour over the milk chocolate and spread evenly. Sprinkle crushed candy canes on top and gently press into the chocolate. Place in refrigerator for 20 minutes, or until hardened.
Remove bark from fridge and let sit for 15 minutes. Flip upside down onto another sheet of wax paper, and peel the paper off the bottom. Break the bark into bite size pieces.

Friday, November 27, 2009

Monkeys need to eat, too

I enjoy baking for my family. Pies, cookies, and cakes are packed full of love, then shoveled into their faces to go where love really belongs: their bellies! One of my favorite items is banana bread. I keep a freezer stocked of bananas that have ripened beyond the casual eater's likening. Every now and then, I'll pull out 3 or 4 bananas and make a loaf of bread. There's nothing quite like a warm slice slathered in butter!

Benjamin now enjoys eating with us. Correction: Benjamin stalks us for food. The kid is a bottomless pit! I much prefer to offer him homemade solid foods rather than the store bought prepackaged kinds. I know exactly what goes into it, and it certainly saves us money. So when I opened my freezer today and saw a shelf of bananas, I knew that I had to make him a treat. Afterall, our fridge is full of pumpkin cheesecakes! I thought about trying to turn my bread into a biscuit for him to eat. He is teething, and it helps ease the pain.

Monkey Cookies!


Ingredients:
3 1/2 cups flour
3 tsp baking powder
3/8 tsp salt
1 1/2 cups sugar
1 cup softened butter
3 eggs
3 mashed bananas (you can use frozen or overripe bananas; they provide a more intense flavor)
1 1/2 tsp vanilla
Directions:
Preheat oven to 400 degrees F.
Comine dry ingredients in a large bowl. Mix well.
Cut in the butter. The dough should be crumbly.
Add remaining ingredients, and mix well.
Drop by teaspoonfuls on an ungreased cookie sheet. Bake for 13-15 minutes.
Makes about 3 dozen. These cookies can be frozen.

These are very cakelike cookies, rather than hard biscuits, but as you can see, Benjamin enjoys them!