Did you have a Birth High? I did. It was the most amazing feeling. I remember thinking, "If I could do that, I can do anything!" Scientists tell me that's oxytocin rushing through my veins. If that's what it was, hook me up for some more! (Though, only the natural stuff please, Pitocin certainly didn't make me feel this way.)
I've been watching a lot of documentaries on Netflix recently, the latest of which have been The Business of Being Born and Pregnant in America. Both movies deal with the medical communities growing disregard for the exerience of birth and their emphasis on convenience. I highly recommend that everyone watch these, but I feel they'll have special meaning to expectant and current mothers. I know that they only solidified my resolve to have only natural births, but they've gotten me to thinking about births in general and how much do we really know?
In asking several of my friends, acquaintences, and family, I was horrified to learn that many of these people considered a Natural Birth to be a vaginal birth, with or without the use of drugs. They thought there's only two kinds: Natural or Cesarean. It made me sad to think that they didn't join in my joy of having a Natural (Unmedicated) Birth! No wonder they all just sort of said, "Yeah, and?"
Now, I'll be honest with you guys. I was pretty naive going into my pregnancy with Benjamin. I never considered a midwife, and I actually didn't think midwives practiced anymore in this day and age. I knew that I didn't want an epidural, but it was mostly because my mother had birthed all 4 of her children without one (so I could too) and not because of the potential risks. I didn't research doctors, I just went to the OB that I had my annual gynological appointments with. I didn't research hospitals (or birth centers for that matter), I just chose the one that was closest to my home. I did absolutely no research on possible complications or drugs used in "aiding" labor. My eyes glazed over in the birth class when they went over these things because "I had an uncomplicated pregnancy, why would I have a complicated labor?"
My OB didn't educate me on anything unless I asked about a particular subject. But how was I supposed to know what to ask if I didn't know my options?! I just went with the flow. I learned the hospital I chose had Doulas available for birthing mothers and after meeting the group of them, I knew that I wanted one of them to be with me, though if the hospital had not made it such an affordable option, I probably would have gone without.
Benjamin's labor was full of interventions, even though it started spontaneously. Around noon of the day he was born (10 hours of active labor at that point), my OB came in and wanted to start Pitocin. When I asked why, he said, "You're not progressing fast enough." I should have asked why I had a deadline (my waters had not broken yet), but I have a better understanding now that he wanted it all done before he was off shift for the day. When I refused, he told me that he'd give me 2 hours but then he had to start it. Again, why did he have to? Baby was in no danger. But, I had only progressed one centimeter and wasn't to the pushing stage that apparently my OB was after, so he started the Pitocin. Not long after that, I thought I was going to die, so I got the epidural. Then they had to up the pitocin because my labor slowed down. And then my doctor was done for the day and came to say he'd see me tomorrow, "hopefully with a baby." By the time I was ready to push, I had no idea what I was doing. I couldn't feel a damned thing wtih that epidural. But both my and baby's heartrate were dropping so I was told I had to get that baby out fast. I ended up with a 4th degree tear that took 9 weeks to heal because I pushed him out so fast he didn't have time to turn his body.
Because of my experience in Benjamin's labor, I was so much more prepared for Miriam's birth. I "reserved" the same doula that was there for Benjamin's birth. She was awesome. I wrote a detailed (super detailed) birth plan and hand delivered it to the birth center (they lost the one from Benjamin's birth when I had mailed it in). I was prepared to say No Way to any and all drugs pushed at me. Whenever threatened "Baby's in danger" at me, I was going to ask what exactly would happen if I waited 30 minutes to make a decision. I was not going to let someone strong-arm me into what they wanted to do. I was more comfortable for her birth. I moaned, as loudly as I wanted, without caring who heard me. I only had Chris and the doula in my room, and I declined all vaginal checks from the nurses. I never felt like I was going to die of pain in her labor. I won't lie, I got really really uncomfortable, but the pain felt like it was doing something progressive and positive. Sooner than I was ready for, Miriam was crowning. I do remember yelling at one of the nurses when she told me to push. I wanted to do this on my own. I wanted Miriam to come on her own, slowly, and safely. I delivered Miriam without a doctor present. A wonderful, and surprised, nurse caught her. Then, in rushed the doctor, arms flailing about that no one called to tell him I was close, and "what if she needed Pitocin" and "what if there was something wrong with the baby". I shrug at it. I was in a hospital afterall. There were 16 doctors present on the grounds, plus another 32 doctors on call if something did go wrong. I would have said no to the pitocin anyway, so I didn't care.
Miriam's birth empowered me. I wish that all women could have such empowering births. I wish that the birthing system in the United States educated women more on their choices of birth than on their choices of birth control. I didn't care for my experiences with doctors, though I loved the caring hands of my doula and the quiet support of my husband. From here on out, any babies being born in my family won't be happening with a doctor. All I felt was love for me, for my husband, for my children through the entire labor, and I don't want it taken away by the presence of anyone else.
I'm still on my Birth High and it empowers me to be a great mother. What did your birth do for you?
Wednesday, February 23, 2011
Monday, January 24, 2011
Soft Baby Shoes
How feaking adorable are these??!!
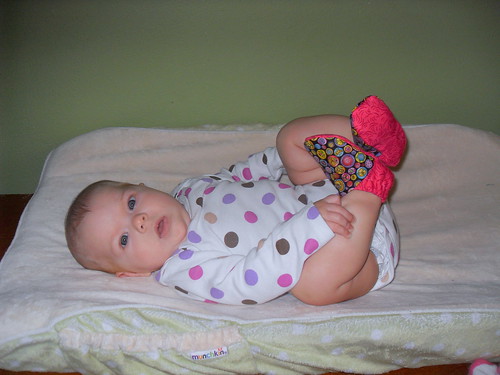
A few of the girls that I commiserate with over on Ravelry have been sewing some adorable soft baby shoes. Of course, that meant I had to grab some fat quarters at JoAnns and try for myself! However, I didn't really read the instructions of the pattern they were using before purchasing my fabric, so I didn't get the bonded fleece it called for. A little craft site searching led me to a different pattern that a lot of people liked. I liked the looks of it, too, so I started cutting fabric, a little scared that it may be just a bit more fussy than I was hoping for.
Heck, no! These are super easy to do! If you can sew in a curved line, you can do this. I didn't make buttonholes for the elastic threading because I've never made them before. This seems like a perfect project to try them out though since they would be on the inside of the garment and no one would ever see the mistakes. One adjustment I did do was to the sole of the shoe. I wanted it to be a little thicker than just 2 pieces of cotton quilting fabric, so I cut up a flannel receiving blanket (those things are too small to be useful anyway) and laid it inbetween the two pieces of fabric. It's the perfect thickness now! The top and inside sole are of the funky dot fabric, while the heel and bottom sole are of the pink fabric.
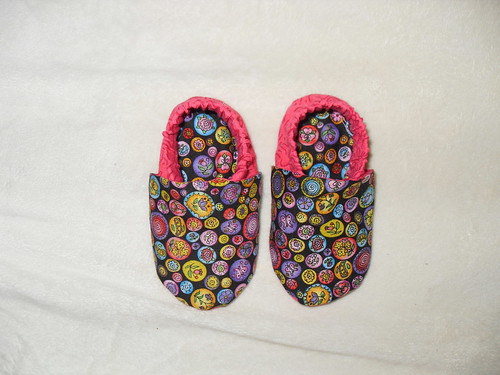
I see a lot more of these being made. Shoes like these are being sold on Etsy for $18. My cost was $1.50 in materials and an hour of labor (say, $10/hr?), so it's a pretty good deal!
A few of the girls that I commiserate with over on Ravelry have been sewing some adorable soft baby shoes. Of course, that meant I had to grab some fat quarters at JoAnns and try for myself! However, I didn't really read the instructions of the pattern they were using before purchasing my fabric, so I didn't get the bonded fleece it called for. A little craft site searching led me to a different pattern that a lot of people liked. I liked the looks of it, too, so I started cutting fabric, a little scared that it may be just a bit more fussy than I was hoping for.
Heck, no! These are super easy to do! If you can sew in a curved line, you can do this. I didn't make buttonholes for the elastic threading because I've never made them before. This seems like a perfect project to try them out though since they would be on the inside of the garment and no one would ever see the mistakes. One adjustment I did do was to the sole of the shoe. I wanted it to be a little thicker than just 2 pieces of cotton quilting fabric, so I cut up a flannel receiving blanket (those things are too small to be useful anyway) and laid it inbetween the two pieces of fabric. It's the perfect thickness now! The top and inside sole are of the funky dot fabric, while the heel and bottom sole are of the pink fabric.
I see a lot more of these being made. Shoes like these are being sold on Etsy for $18. My cost was $1.50 in materials and an hour of labor (say, $10/hr?), so it's a pretty good deal!
Friday, January 21, 2011
Dressing the Little Man
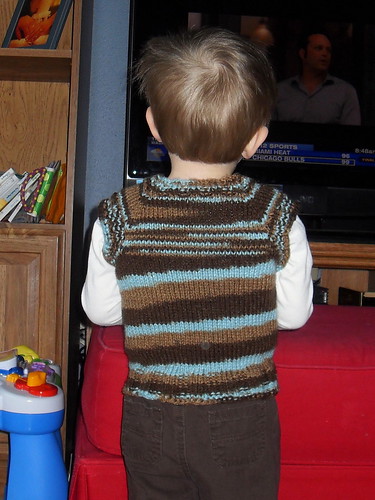
I love vests on little boys. Seriously love vests. There's no better way to turn a rough and tumble toddler into a stunning charmer than to slip on a sweater vest.
I wanted to knit something special for Benjamin since I had been doing so much knitting for Miriam before she was born. My little man was the object of many hats, mittens, socks, and sweaters while he was an unopinionated infant, but once he reached toddlerhood, his opinions became very strongly against handknits. But, there is one word that fixes all that: Special. Special mittens, Special hat, Special socks. Adding Special as a descriptor equals instant excited doning of the newly knit object.
Introducing Benjamin's Special Vest
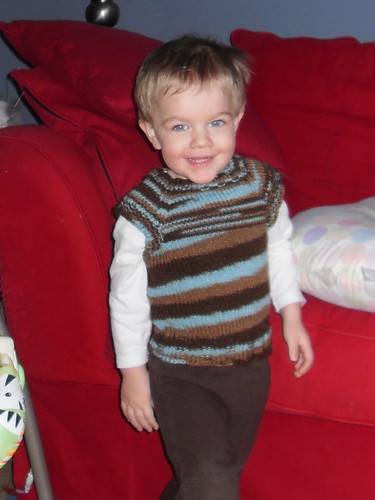
Pattern: Toddler T-Shirt Vest
Yarn: Red Heart Super Saver in Earth & Sky
Needles: US8
details at Ravelry here
I wanted to knit something special for Benjamin since I had been doing so much knitting for Miriam before she was born. My little man was the object of many hats, mittens, socks, and sweaters while he was an unopinionated infant, but once he reached toddlerhood, his opinions became very strongly against handknits. But, there is one word that fixes all that: Special. Special mittens, Special hat, Special socks. Adding Special as a descriptor equals instant excited doning of the newly knit object.
Introducing Benjamin's Special Vest
Pattern: Toddler T-Shirt Vest
Yarn: Red Heart Super Saver in Earth & Sky
Needles: US8
details at Ravelry here
Tuesday, January 18, 2011
Nutella sandwich cookies
Ummm...so I'm totally not updating everyday, now am I? My computer's broken though, so now I have to share the desktop with Chris, and since we each only get computer time when the other has the baby, it's a juggling act and I'm trying not to hog it. You people out there are the only adult socialization I get nowadays!
Benjamin's becoming a little cook. He loves to "stir" things, though it's more like flinging things out of the bowl! I enjoy having him help because it means he's more likely to get excited over dinner if he helped make it. Last Friday, Daddy had Bake Club at work. Normally, I would tell him, "You signed up for it, you bake for it," but I usually do come up with an idea for him. I have 14 pounds of sugar cookie mix, and I started thinking about what can be made that's a little more exciting than just plain sugar cookies. I also cleaned up our pantry and discovered that I like to hoard Nutella. So...
Nutella Sandwich Cookies!
Bake your favorite roll-out sugar cookie dough in whatever shape you desire.

Drop a good sized dollop of Nutella right in the middle of one cookie.

Place a second cookie on top of it and give a little squeeze.

Repeat until you have used all 7.5 dozen cookies. Yeah, I made 7.5 dozen cookies (which only translates to 45 sandwich cookies).
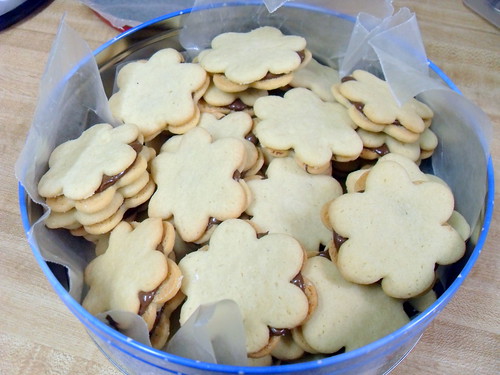
Super easy, super yummy! Apparently some people at Chris's work had never had Nutella before. If you haven't had it, you are seriously missing out!!
Benjamin's becoming a little cook. He loves to "stir" things, though it's more like flinging things out of the bowl! I enjoy having him help because it means he's more likely to get excited over dinner if he helped make it. Last Friday, Daddy had Bake Club at work. Normally, I would tell him, "You signed up for it, you bake for it," but I usually do come up with an idea for him. I have 14 pounds of sugar cookie mix, and I started thinking about what can be made that's a little more exciting than just plain sugar cookies. I also cleaned up our pantry and discovered that I like to hoard Nutella. So...
Nutella Sandwich Cookies!
Bake your favorite roll-out sugar cookie dough in whatever shape you desire.
Drop a good sized dollop of Nutella right in the middle of one cookie.
Place a second cookie on top of it and give a little squeeze.
Repeat until you have used all 7.5 dozen cookies. Yeah, I made 7.5 dozen cookies (which only translates to 45 sandwich cookies).
Super easy, super yummy! Apparently some people at Chris's work had never had Nutella before. If you haven't had it, you are seriously missing out!!
Thursday, January 13, 2011
Miriam's new hat
I had some leftover yarn (well, actually nearly half the skein!) from my Tympany hat. Miriam also has outgrown all of her newborn hats. Those two facts meant that it was time to knit Miriam a new hat, and why not a hat that matches Mommy's?
This is Miriam's Modified Jewel Hat
Pattern: Jewel Baby Hat with my own twist
Yarn: Dream in Color Starry, colorway Pansy Go Lightly
Needles were a US 3
More details on Ravelry here.
This is Miriam's Modified Jewel Hat
Pattern: Jewel Baby Hat with my own twist
Yarn: Dream in Color Starry, colorway Pansy Go Lightly
Needles were a US 3
More details on Ravelry here.
Tuesday, January 11, 2011
Art on the wall
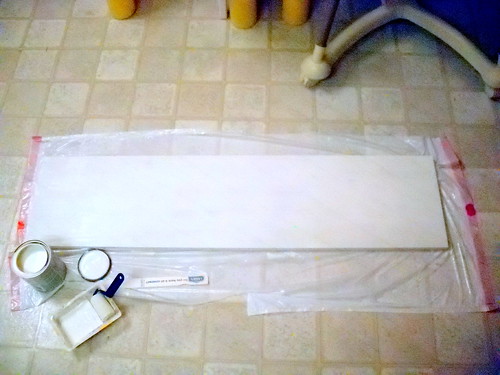
We just had our living room walls repaired from drywall damage so a nice new paint job was in order. The lovely blue really did make the room more finished and cozy. However, when all the painting was done, the pictures came off the wall and I decided to do a little moving around of things. I chose to move the picture that was previously above our couch to a different area of the room which left a big gaping space above the seating area. I had an idea of art work that I wanted over the couch, but I couldn't find anything that fit the specifications I was looking for. So, in my general "I can do it myself!" attitude, I got myself and the kids to Lowes and picked up supplies.
I bought 3 pine wood boards measuring 3/4"x12"x4'. I also got some large picture-hanging D-rings and heavy duty anchors for the wall. The paint is all leftover sample paint colors that are in my home.
First, I put on three coats of the base color (Olympic's White Smoke) using a small 3" roller. I could have probably gotten by with just one coat if I had taken the time to lay down some primer, but it really didn't use much paint for this project (I still have 1/2 the quart left) and it didn't take much time at all for this step. I let the base color dry overnight.
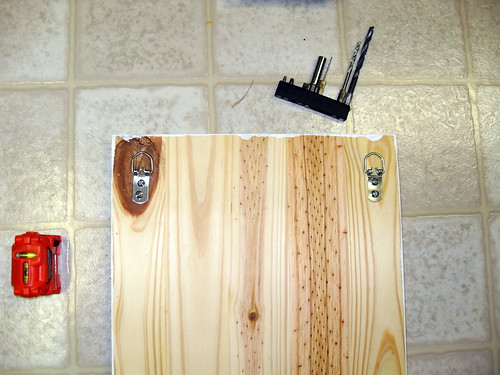
The next morning, I took my trusty 2" paint brush and got to work. The design is created by brushing, dabbing, dripping, and splattering paint from the brush. I didn't allow the colors to dry in between each application of a new color. It didn't make much of a difference since my house is pretty dry and everything set quickly. (Colors are all Olympic paint. Green = Quaking Grass, Red = Bonfire, Blue = Kaleidoscope, and Yellow = Toffee Crunch)

At the end of the day, when everything was dry, I flipped the boards over and installed some picture-hanging D-rings at the tops.
Then, with the help of my husband who is much taller than I am and can actually see that close to the ceiling, we hung the pictures on the wall with a 6" space between each board.
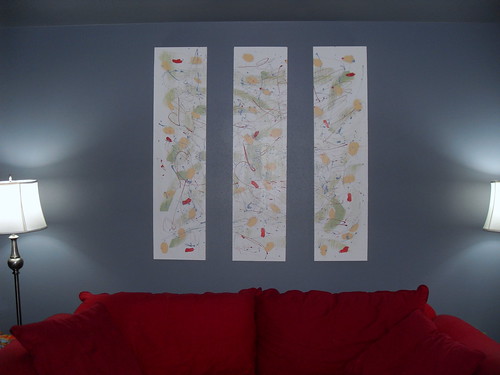
I think it looks pretty nice! I like that there's still plenty of white visible on the boards since it helps to reflect more light and brighten up the space. The blue on my walls (Sherwin William's Storm Cloud) makes the room pretty dark at night.
I bought 3 pine wood boards measuring 3/4"x12"x4'. I also got some large picture-hanging D-rings and heavy duty anchors for the wall. The paint is all leftover sample paint colors that are in my home.
First, I put on three coats of the base color (Olympic's White Smoke) using a small 3" roller. I could have probably gotten by with just one coat if I had taken the time to lay down some primer, but it really didn't use much paint for this project (I still have 1/2 the quart left) and it didn't take much time at all for this step. I let the base color dry overnight.
The next morning, I took my trusty 2" paint brush and got to work. The design is created by brushing, dabbing, dripping, and splattering paint from the brush. I didn't allow the colors to dry in between each application of a new color. It didn't make much of a difference since my house is pretty dry and everything set quickly. (Colors are all Olympic paint. Green = Quaking Grass, Red = Bonfire, Blue = Kaleidoscope, and Yellow = Toffee Crunch)
At the end of the day, when everything was dry, I flipped the boards over and installed some picture-hanging D-rings at the tops.
Then, with the help of my husband who is much taller than I am and can actually see that close to the ceiling, we hung the pictures on the wall with a 6" space between each board.
I think it looks pretty nice! I like that there's still plenty of white visible on the boards since it helps to reflect more light and brighten up the space. The blue on my walls (Sherwin William's Storm Cloud) makes the room pretty dark at night.
Sunday, January 9, 2011
Silent Sundays
I've had a very busy day filled with lots of family togetherness. So, from here on out, Sundays will be dedicated as always to my family and the blog will be silent. See you tomorrow!
Subscribe to:
Posts (Atom)