Saturday, July 2, 2011

Tour de Fleece

Well, the Tour de France has started today! However, in even more exciting news, the Tour de Fleece has started as well!! What? You've never heard of the Tour de Fleece? But it's only the most grueling and demanding spinning competition ever!

Okay, it's not grueling or demanding, unless you want it to be. You set your own goal, be it yardage, finished product, or time invested. You join teams based on your personal interests, your talent level, or your spinning instrument of choice. There's a huge group of spinners on Ravelry who are participating in the Tour de Fleece, like over 4300 huge!

I've joined Team Rookie (because I've been actively spinning for less than 1 year) and Team Trindle (because that's the type of spindle I've chosen to spin on). My goal is to spin a minimum of 15 minutes a day, with letting go of my "park and draft" method when we get to the mountain stages (same day the Tour de France does!). I'm hoping that by the end of this TdF, I'll be a more confident and even spinner, perhaps enough to justify more fiber purchases at the Wisconsin Sheep and Wool Festival in September!

Day 1 Tour de Fleece Collage

I am spinning from a turquoise 6oz Corriedale roving on a 13 gram Trindle.

Friday, July 1, 2011

The Ice Cream Incident

What do you do when it's 90 degrees outside? You eat ice cream, of course!!

Saturday, June 25, 2011

The Leftover Skirt

A bit ago, I picked up the most gorgeous 2 yards of linen I have every touched. It was mostly due to color, being a fabric woven with a light yellow-orange thread in one direction and a bright fuschia thread in the other. I had purchased it, meaning for it to become a linen ring sling. I washed the fabric, which turned gave a luxuriously soft hand and now made it a very easy to care for fabric! I made my sling by cutting the fabric in half lengthwise, leaving me with a piece of leftover linen that was 29" wide by 2 feet long. I thought about making a second sling from it to gift to someone else, but 2 yards makes for a really short sling and not many people are as small as I am to appreciate that. So I set it aside for some further thought.

Then, it came to me. A Skirt! I need a skirt. I'm not a woman who likes to wear shorts. I wear a lot of jeans and capris, and before becoming a breastfeeding momma, I wore a lot of dresses in the summer. (Needing to breastfeed at a moments notice, I no longer wish to wear one piece dresses as I prefer to lift my shirt from the bottom to nurse.) But, if the skirt is comfortable enough, casual enough, and long enough, I can chase kids in it!

shorts and fabric

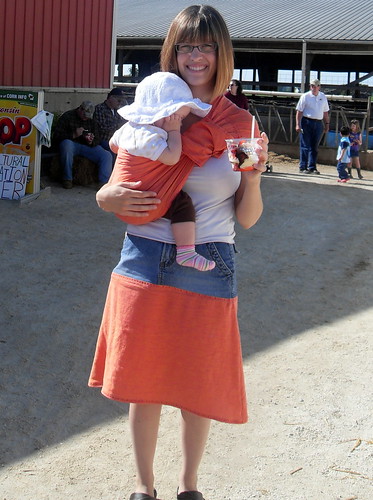
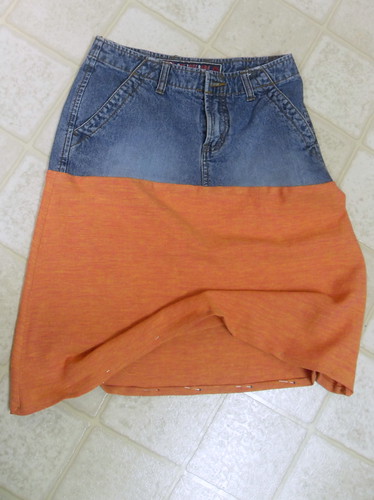
So I made my skirt, making it a more casual option by pairing it with a pair of jean shorts that didn't fit well in the crotch area anymore. I've gotten some good comments on it, as well as other moms wishing for the pattern, so I thought I'd put it out there for anyone interested!

cut off legs - front

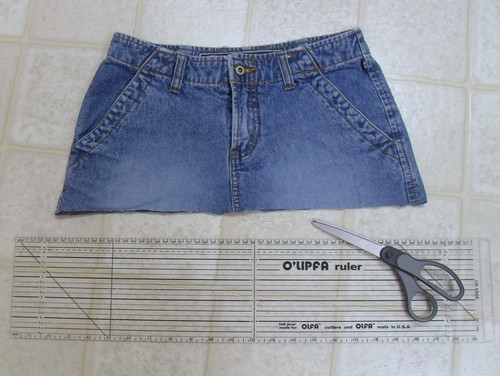
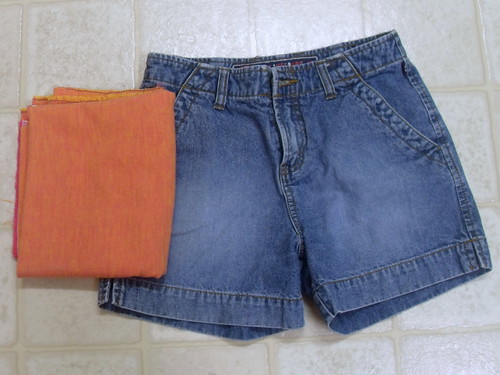
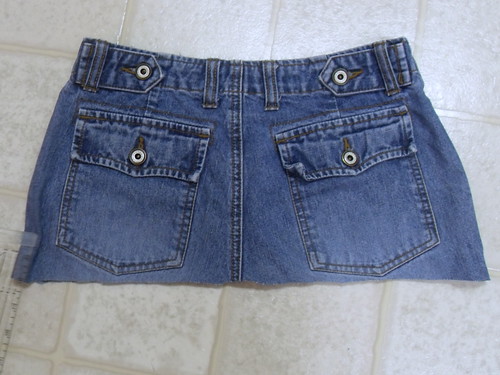
Step one: Cut the legs and crotch off the pants or shorts in a straight line from hip to hip. If you want to keep the back pockets on, you might want to turn the jeans over to make sure you're cutting below the pocket line.

cut off legs - back

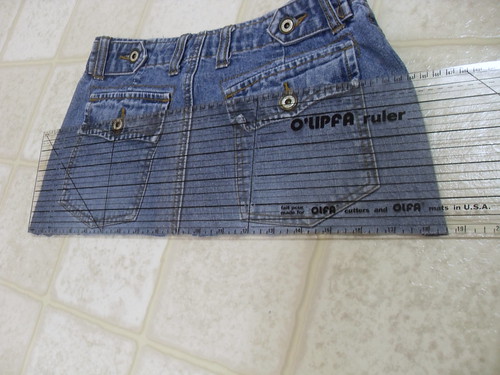
Step two: Measure the width of your jeans along the cut edge and add 1/2". As you can see, my jeans measured 18.5", so my number for this step is 19".

measure width of jean bottom

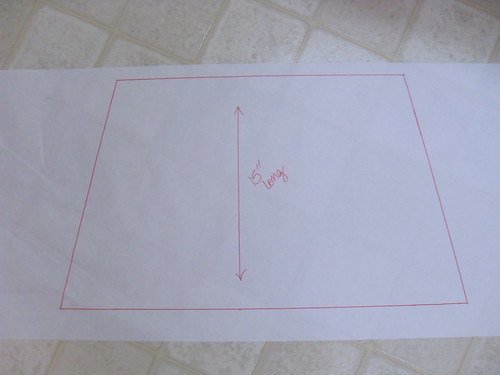
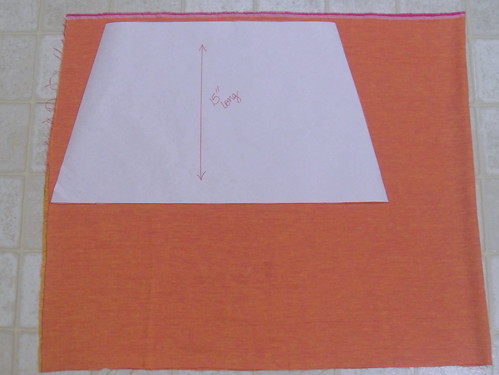
Step three: Draft your pattern. It's going to look like a trapezoid. Along the top, draw a line that equals your final number from step two (my line is 19" long). Measure 15" down from the line you just drew. Draw another line, perpendicular, that is 7" longer than your first line (so my bottom line is 26" long). Connect the two lines to create the trapezoid. Now, how did I come up with the 15" length? I put on my jean top and hung a measuring tape down from the cut edge to determine the length I wanted. I added 1" for seams.

draft skirt

Step four: Cut your fabric using the pattern. Make sure you cut two pieces. I made my pattern on freezer paper. Did you know that you can iron the freezer paper onto your fabric so you can cut without needing pins or having your fabric shift? I just learned that on this project!

lay out on fabric

Step five: Sew your skirt side seams. With right sides together, stitch along the trapezoid sides with a 1/4" seam. Finish off the seam so the fabric doesn't unravel. I did a zigzag, but you could do an overcasting stitch.

sew side seams and finish

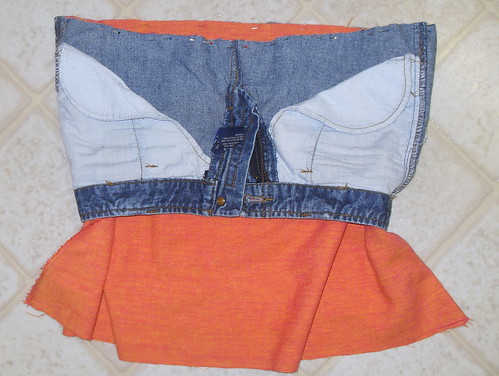
Step six: With right sides together, sew your fabric to your jeans along the short side, using a 1/2" seam. (Ummm...why yes, I did put right side to wrong side...and then I had to unpick the seam and do it again.)

attach skirt to jeans

Step seven: Hem your skirt with a 1/2" folded hem. (Fold up 1/4" inch, press, and then fold up another 1/4" inch and press.)

sew a 1/2" double hem

double hem

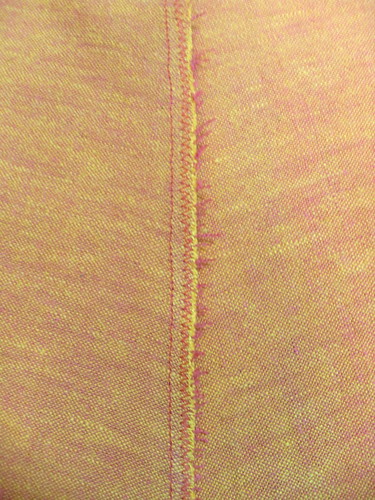
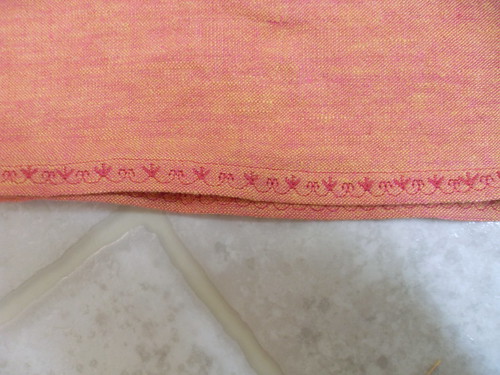
Step eight: You need to finish the raw edge of the fabric where it meets the jeans, to avoid the seams unraveling. I chose to do a decorative top stitch, catching the jeans and the fabric in the stitching. I also did it along the bottom hem.

embellish with machine embroidery

(Detail of the decorative embroidery stitch)
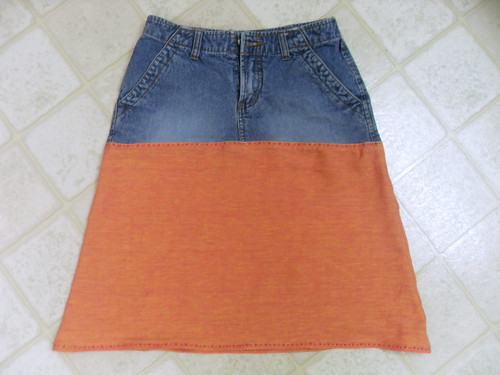
detail of machine embroidery

Ta-da! All done!
leftover skirt - front

leftover skirt - back

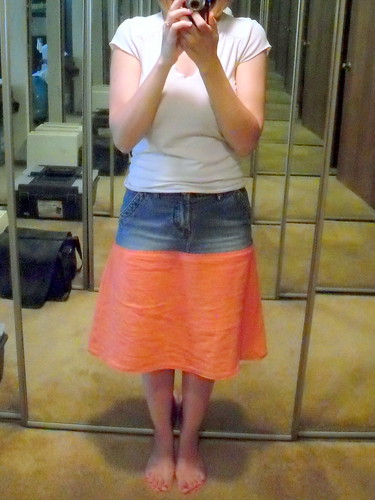
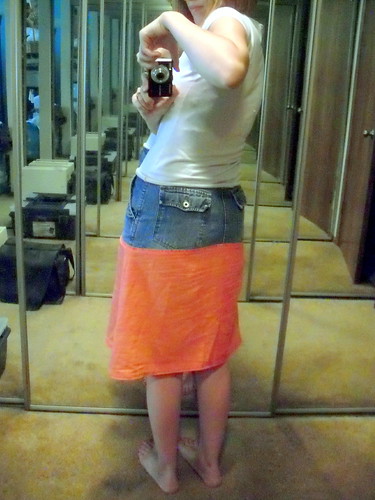
And I wore it, paired with the sling made of the same fabric. Unfortanately, I was standing funny and didn't think to check the side seams of the skirt in this picture!

Leftover skirt + ring sling

Monday, May 30, 2011

Kitty Foster Family Needed

We're preparing to sell our condo, and we're being realistic about it. In this market, it is not going to be snatched up based on location and potential (which is why we bought it). We are prepared for it to take a good long time to sell. Of course, all you need is that one special person to see what you see in your home! We're hoping to have it listed by the end of the summer.

However, we've got some work to do in the meantime. There's the cosmetic work, and the training of children (and ourselves) to be neat and clean for those impromptu visits from potential buyers, and generally making our place more appealing than the other units for sale in our building. That means, we actually have to follow the bylaws of our association. One of those bylaws says "no pets." Heavy hearted, we have decided it would be best for our family if we found foster parents for our cats until we are able to sell the house, or until August 2012 when we will be moving regardless of the home being sold.

Would anyone be willing to take one or both cats for a maximum time of one year? The cats will have a clean bill of health from the veterinarian before coming to your home, and all food, litter, vet bills, and other supplies will be paid for by us.

Carmina

Carmina

Carmina is a 8 year old female American Shorthair. She has claws on all four feet, and is an indoor-only cat. Carmina has gotten a bad rap as being a mean cat, as she has swiped at those who have not respected her space in the past. However, she has mellowed out with age, learning that if she wants any attention at all, she had better be a well-behaved, cuddly kitty. She will often crawl into your lap, not really for petting, but just as a comfy warm spot to sleep. Carmina is a pretty laid back cat in her adult age, not needing much interaction or play. She will let you know when she's lonely by "forcing" you to pet her! She does well with children of all ages, but please don't force kids on her as she likes her space. She mostly copes by staying completely out of their way, though she is tolerant of Miriam occasionally chewing on her tail. Carmina's favorite place to sleep is at your feet in the bed. She is tolerant of dogs, though she has never lived with one. She has no problems with litter box usage or hairballs.

Loki

Loki

Loki is a 5 year old male Maine Coon, but he's on the smaller side of the breed at about 14 pounds. He also has claws on all four feet and is indoor-only. Loki is a lover. Like most Maine Coons, he has a strong desire to be with you at all times. He loves to be pet and cuddled, though he won't sit still and chill with you until it's bedtime. Loki is a talker! He is very vocal and is perfect for when you need a conversation above a 2 year old level. :-) He also is pretty laid back and will entertain himself for the most part. He does have long hair, but doesn't need extensive grooming. He gets mats in his hindquarters and we rake through them once a month for him so they don't get too bad. Loki also does great with kids of any age, but does choose to stay out of their way. You'll find Loki's favorite place to sleep is next to your head by your pillow in bed. Loki does not tolerate dogs and finds them very scary and stress inducing, even the ones that are smaller than he is. He also has no problems with the litter box or hairballs.

These cats are our furry children. If you agree to foster them, we will do whatever we can to make it an easy experience for you, including coming to clip their nails and grooming if you're not comfortable with that. All we ask is that you treat them with the same respect we would expect you to treat our children with!

Wednesday, May 11, 2011

One smart little cookie:

My son is a pretty smart little 2 year old, if I say so myself. I'm amazed that we don't have more tantrums because our inability to always clearly communicate with each other. Every day he has a new way to express what he's thinking and I'm just wowed by how his brain works. I'll let you in to a little conversation we had tonight.

Benjamin wants me to read him a story.
Me: "Honey, I will read you a story in 5 minutes. It's time to give Miriam some medicine." (Miriam has an ear infection.)
Benjamin: "Yeah, Momma. Miriam's tummy hurts." (He's remembering from when he last got medicine because his tummy hurt when he had rotavirus last month.)
Me: "Yeah, something like that. Her head hurts."
Benjamin: "It's okay. Momma make it better."
Me: "Yes, Momma will make it better."
Benjamin: "Yup, Momma's good. Momma fix it."

About a half hour later, when Miriam was finally succumbing to the affects of the pain medication and had stopped fussing so badly, Benjamin goes up to her and pats her on the head.
Benjamin: "All better Miriam? All better?"
Me: "Yep, Miriam feels better now."
Benjamin: "Oh, good. Now go asleep, Baby. It's time for popcorn!" (We've been having popcorn as a snack after Miriam goes to bed.)

See, isn't his mind just amazing?!

Tuesday, May 10, 2011

My Kefir overrunneth

My mother first introduced me to Kefir and it's probiotic qualities when Benjamin was a year old. At that time, he already had 5 ear infections and was trying to beat a really stubborn one. She brought over some store bought Kefir, and Benjamin went crazy for it! Because you have to shake the bottle before serving, he started calling them his "shake, shake, shake." Within a few days, his ear infection was gone, and he's never had another one come back. Was it because of the Kefir? Who knows?! But I can tell you that Benjamin drinks one every day for breakfast, and if he stops drinking it, he gets sick. I believe it strengthens his immunity. Also, I'm really prone to colds and respiratory infections, so when the Chris came home with a cold, I started drinking Kefir too. I had a slight sore throat, but it never progressed into anything more. Now, this could all be coincidence, but why tempt fate?!

The downside? Store bought kefir is expensive. We typically get it from Costco, where it comes in a box of 12 single serving bottles and is priced at about $0.84 a serving. However, Costco routinely stops carrying it for a month or two and then we need to purchase it from the grocery store where they have 32oz bottles (4 servings) and it comes out to $0.92 a serving, and even then we might not find it every week.

My mother decided to try making her own kefir, after I innocently asked if one could even make it. She purchased her grains, and started the brewing process. Before long, she had more than enough grains that she sent them to me. Here's how you brew your own kefir.

Here are my grains. They are translucent and cauliflower-like in appearance. These are milky because they were just pulled out of a milk brew.
Kefir Grains

Put your grains (about 1TB in size) in a clean glass jar. I'm using a tall quart canning jar.
Kefir grains in mason jar

Add one cup of milk over your grains. You can use any cow's milk, goat or sheep milk, or soy or almond milk you want. I have 1% cow's milk in the fridge, so that's what I used.
Add 1 cup milk to kefir grains

Cover your grains in order to keep dust out, but you do need to allow air circulation. I covered mine with a coffee filter. Leave it sit on the counter, out of sunlight, for up to 24 hours.
cover kefir with coffee filter

When the kefir is done brewing, it'll be a bit thick (like a runny version of yogurt) and have a tangy taste reminiscent of plain yogurt. The milk may have separated and formed curds. Strain your grains out. Do not use any metal strainers or utensils because the metal will kill the grains, and do not store it in plastic as the grains will eat that. I use a plastic strainer and a plastic baby spoon to do the straining, but I store it in a tall pint mason jar with a plastic freezer canning lid. Now you keep it in the refrigerator until you're ready to use it. (This is two brewings. You're still left with 1 cup of liquid each time.)
2 batches of kefir

This Kefir is the exact same stuff in the store bought bottle. The only difference is that I haven't turned it into a smoothie. I could blend some strawberries or blueberries or other fruit with it and you wouldn't be able to tell the difference.
my kefir vs. storebought kefir

But, today, I thought I'd make a Chocolate Peanut Butter Banana smoothie. You can use Kefir for anything that you would use milk, yogurt, or sour cream for. This recipe originally called for skim milk. With the Kefir instead, it really brings the taste of the banana to the forefront! I gave Chris a drink and didn't tell him there was Kefir in it (he has up until this point refused to drink Kefir on principle), and he thought it was good! Be forewarned, this is a very rich drink though.
Chocolate banana peanut butter kefir smoothie

Ingredients:
1 cup kefir
1 cup ice
1/2 cup creamy peanut butter
3 TB chocolate syrup
1 banana

Blend all the ingredients together. Makes 2 servings.

Friday, April 15, 2011

Making playdough

Benjamin wanted something fun to do today, and since we're no longer visiting family in California, we couldn't go to the park like he asked. It's a bit chilly (ummm...37 degrees compared to the 70s we left behind) and a little wet and soggy still. So I promised we would make some playdough. The kid loves to help in the kitchen, so I knew he'd have fun making it with me, and he's had fun playing with the commercial stuff in the past. I can't bring myself to actually purchase the containers from the store because I'm a bit of a perfectionist and get really disappointed when the colors are mixed together by toddlers and can't be undone. Homemade dough, however, is extremely inexpensive and doesn't seem to bother me to have to throw it in the trash when it dries out.

Ingredients
1 cup flour (I used unbleached white flour)
1 cup salt (I used Kosher salt)
1/2 tablespoon Cream of Tartar
1TB vegetable oil
1 cup water
food coloring

In a stockpot, place your flour:
Making Playdough - 1 cup flour

Add your salt:
Making Playdough - 1 cup salt

Then, your cream of tartar. This adds elasticity to the dough. It can be skipped, but you'll end up with a more crumbly dough:
Making Playdough - 1/2 TB cream of tartar

Pour in your vegetable oil. I will try substituting baby oil next time as I hear that will keep the playdough for longer since vegetable oil can go rancid:
Making Playdough - 1 TB vegetable oil

I mixed my food coloring into the water before adding to the pot. I found that 8 drops total gave a bright, true color. Turns out, Benjamin is an excellent mixer of colors! I think he's going to take after his Aunt Sarah in art abilities. I have Neon Food/Egg dye drops (McCormick brand), and I added 6 blue drops, and Benjamin insisted in adding 2 purple drops. Those 2 purple drops made the blue much more exact!
Making Playdough - 1 cup water with 8 drops food coloring

Cook this mixture on medium-low heat. You'll need to constantly stir in order to prevent the flour from burning. It shouldn't come to a boil, and the mixture won't get very hot. In a few minutes, it'll become very difficult to stir and the mixture will loose the liquid quality. Dump it out on a piece of wax paper:
Making Playdough - after cooking

When the mixture is cool enough for you to handle (I was able to hold it immediately after dumping because it really doesn't get too hot), knead the dough. This will ensure that all the flour is mixed in and break up any color dye flakes that became concentrated. Afterwards, I patted the dough out flat to cool down faster.
Making Playdough - after kneading

All done! I made pink and blue, upon request from Benjamin. Pink = 6 drops pink + 2 drops purple. Blue = 6 drops blue + 2 drops purple.
Making Playdough - pink and blue

Once the dough is completely cooled, it should be stored in airtight containers. I keep mine in zip top bags with all the air squeezed out.
Making Playdough - store in zippered bags

Benjamin got right down to work making "dinner" with his dough!
Making Playdough - having fun playing
We had playdough hamburgers and pancakes for supper. :-)

I think this would be a great gift for Easter or birthday favor. Package smaller chunks in the plastic baby food containers or wrapped in cling wrap. Can you think of more novel ways to package it?